Basic Lip Balm: two ingredient recipe

DSC_1181

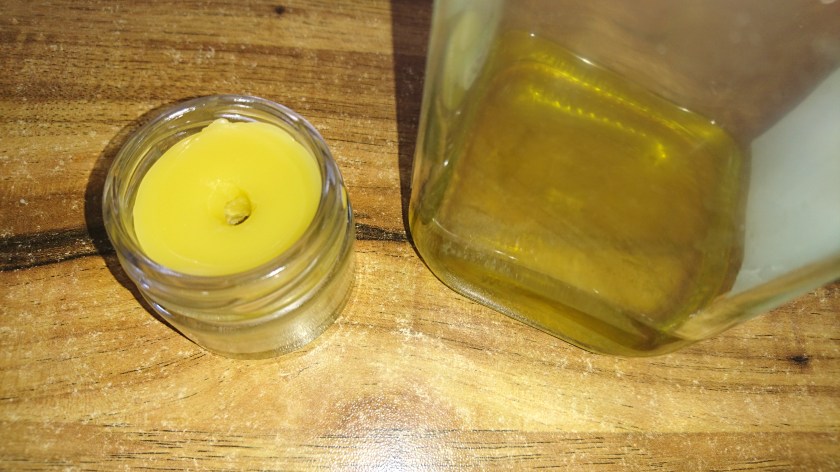
I ran out of lip balm a few cold and windy days ago, and rather than venturing out in this weather, I thought I’d try making my own.

Most lip balm recipes call for beeswax, which I thought I didn’t have on hand, but then I discovered some fragments of a broken beeswax sheet while I was clearing out a drawer (Pesach, here we come! ). Perfect!

Other than the beeswax, the only ingredient you will need is oil – I used olive, but coconut, jojoba or another nourishing oil would work just as well.

The proportions are approximately 1 part beeswax to 6 parts oil. You can decrease the amount of beeswax a little if you live in a cold climate and would like your lip balm to be softer.

Mix the oil and beeswax in a small pot over a very low flame, or better yet, place your small pot into a larger pot filled with boiling water and stir. The beeswax will melt very quickly.

Optional: at this point you can add some essential oils. I added a drop of mint and rosemary for a refreshing herbal scent.

Pour the mixture into containers and allow to set. That’s it! A few minutes of work, and you have a healthy, natural balm that’s great for your lips and other extra dry areas such as elbows and heels. It can even be used as a diaper cream.

PS: in case you are wondering about the hole in the middle of the lip balm jar, I suspect it had set this way because I popped it into the refrigerator to speed up the process.

Along with homemade soap, a cute little jar of this lip balm would make a fantastic gift for whomever you might want to pamper.

Cheering up with chickens

DSC_1167

Wherever we are, it seems like it’s only a matter of time until we find some chickens. It turns out we have a neighbor who has a whole yard full of poultry (we found him through the crowing of his roosters), including all my favorite chicken breeds such as Silkies, Brahmas, Polish, Wyandotte, Sussex… And it turns out we have some poultry aficionados as common acquaintance. So now hopefully, once I am able to nudge my husband (*smile*) in the direction of building a coop and giving the incubator a test run, we can get fresh eggs for hatching. Really, in moving here, there is nothing I miss like my chickens. For the time being, we go to visit and feed our neighbor’s birds whenever we can.

DSC_1174

Speaking of going somewhere… There hasn’t been much of that lately because the rains have been SO intense for the season. We even missed our regular afternoon in the library today! I’m surprised at the strength of my craving for sunshine, warmth and all that comes with it – hammocks, picnics, wading pools, bare feet, and working in the garden.

In the meantime, we have been trying to make the best of these days of being cooped up inside (as you can judge by Shira’s modeling clay art), drawing, reading, and taking out all our favorite board games. We have actually finished the fifth Harry Potter book, which has been our ongoing read for months.

DSC_1178

I have also been putting the closets in order and discovered another stash of yarn scraps that will be just perfect for a doll-making project. Once, of course, I put Pesach (and all the cleaning it entails) behind me.

I hope spring is on its way to all my friends in the northern hemisphere!

When winter refuses to give up

Last night, we were awake multiple times due to one of the most epic thunderstorms I have witnessed this year. In the morning, we got up to a quiet, moisture-filled world, with water dropping down from the tree branches and puddles everywhere.

DSC_1160

There’s even a little stream of sorts that flows after heavy rains, and guess who loves to put on his rubber boots and wade through it?

DSC_1152

The spring flowers, however, won’t take no for an answer. They know it’s their time to bloom.

DSC_1156

I, too, am gearing up for warm weather projects and making a little dress for Hadassah. I hope to finish it soon and post the tutorial as well.

Have a wonderful early spring, everyone!

Spring flowers

Have I mentioned that I’m not a winter person? I’m sure I have, a time or twenty. Yeah, yeah, I know what you’re all thinking – that we have no real winter here. However, short days, lack of sunshine, and rain make me want to crawl under a blanket and sleep until it’s spring again.

So you can imagine how happy I am when it’s sunny and warm and all my favorite flowers are out.

DSC_1148

Beautiful white cyclamens – we need to decide where to plant them so that they can bloom again next year.

DSC_1149

More cyclamens, of a smaller, wild variety. They smell delightful.

Forget-me-nots.

DSC_1146

Pink geranium, growing by the day and quite happy in its new home.

DSC_1145

Look at that big stalk growing out of our aloe plant. You can also see a tomato bush or two in the background. And yes, the weeds are winning the race against us, because they, unlike us, didn’t mind being out in the rain these past few days!

I’m wishing happy spring to you all. My mind already transports me to the season beyond Pesach cleaning, to the joys of long afternoons, iced lemonade, hammocks and crickets.

Crochet Tutorial: The Puff Stitch

Like its name implies, the puff stitch is puffy and can add tons of texture to any crochet project. I personally love it, but it’s a bit tricky to master and goes a little beyond basic crochet skills. It works best with yarn that is relatively thick and fluffy (not thin cotton/bamboo) and doesn’t have a tendency to separate into strands.

The basic principle of the puff stitch is casting on a loop of yarn as you would for a double stitch, but rather than binding it off at the top, you cast another stitch, and then another, as shown in the diagram here:

Step 1:

3-hdc-puff-st-1

Step 2:

3-hdc-puff-st-2

You can see a video of me crocheting the puff stitch here:

I’m working with lovely natural merino wool such as this one. It has a delightful texture and is a joy to work with.

A pattern sample incorporating the puff stitch:

DSC_1142.JPG

Note: the puff stitch, like other textured crochet stitches, does take up substantially more yarn, so if you aren’t sure how much you need for a project, it’s better to stash up!

Disclaimer: this post contains affiliate links.

Cloud in a jar science experiment

DSC_1134

I’m always on the lookout for interesting, educational stuff I can do with my kids, preferably something that doesn’t involve a lot of mess. This cloud in a jar experiment is easy peasy and pretty cool!

You will need:

A jar

A balloon

Very hot water

A match

A flashlight

Cut off the narrow part of the balloon and make sure it can fit over the mouth of the jar.

Pour about 1/2 an inch of hot water into the jar. Light the match and, tilting the jar, capture some of the smoke. Discard the match and quickly cover the jar by stretching the balloon over the top.

Put pressure on the balloon with your fingers (make sure to secure it in place so it doesn’t slip off). Release. Do it several times to watch the cloud form and condense!

For a more impressive display, dim the lights and shine through the jar with a flashlight to see the swirling mist inside.

Explanation: putting pressure on the balloon increases pressure inside the jar, which in turn increases heat. Releasing the pressure makes the vapor from the hot water cool down and condense on the smoke particles – that’s how real clouds form, by condensing over particles floating in the air.

When you are done playing, take the balloon off and watch your cloud gently float upward out of the jar.

Softie Crochet Doll: how-to

DSC_1124

A couple of weeks ago, I found a bag of yarn scraps someone had thrown away. You know I couldn’t just pass! Implementing my own advice on using scraps of yarn, I washed the whole stash and set about making this little doll.

I didn’t follow precise instructions, though there are many patterns you can draw upon. This is an intermediate level project that does require some thorough familiarity with the basics and intuitive knowledge on when to add or reduce stitches.

Most of the work on this project was done with single stitch. I used crochet hook number 3 and acrylic yarn similar to this one.

Step 1: Head and body

DSC_1110

Head: start working a round shape as you would when making a hat, but reduce stitches towards the bottom to make a curved ball-like shape. Leave off a narrow brim – later you’ll slip stitch around it to attach it to the body.

Body: start from the bottom – make a ring and work your way up, gradually reducing stitches. Reduce rather more dramatically towards the top, creating a curvature and leaving off a narrow opening.

Cross stitch, embroider or otherwise make eyes and mouth on head and slip stitch it to the body.

Fill with stuffing and close body off at the bottom.

Step 2: Arms and legs – make rather narrow ring and crochet round and round, making a sort of hollow tube of desired length. Slip stitch arms to the sides of the body and legs to the bottom. Fill with stuffing and stitch up.

Hair: Make a large, rather floppy pompom, attach to head by slip stitching and trim off as desired.

Clothes: This dollie is dressed in a basic little frock I whipped up, and has a miniature version of Bev’s Very Easy Booties on her feet.

End result: soft, lightweight cuddly doll my kids love to snuggle. They were delighted with the process, too! It was very rewarding, as it worked up so quickly and the little ones were so gratified.