Myrtle berry jam

Following my previous post on myrtle’s culinary uses, I have been experimenting with myrtle leaves and berries some more. I guess I’m just really tickled that there is a berry which grows well and prolifically in our area – and it’s free for picking!

I have tried to search online for myrtle berry jam recipes but couldn’t find anything definite, except that on one site I’ve read the berries are used in mixed fruit jam, generally along with apple. I cooked up a small experimental batch with about 1:1 ratio of myrtle berries and apples, sweetened to taste. After cooking, I ran it all through a food processor and got a beautifully colored, unique-tasting jam which I’m sure will be great as yogurt or granola topping, on toast, or even as roll or pie filling (if I make a larger batch).

The astringency of the berries is almost gone after cooking, and the only improvement suggestion I’d give myself for the future would be to strain the cooked berries and discard the seeds, which have a somewhat coarse texture and slightly bitter taste.

Left: myrtle berries; right: apple and myrtle berry jam. 

Myrtle: the kitchen discovery

myrtle

Myrtle is very common in Israel and in the rest of the Mediterranean as well, its hardiness and evergreen freshness making it a perfect choice for decorative hedges. It also has a significance in the Jewish faith, being one of the four species used in celebrating Sukkot (Feast of the Tabernacles).

It was only very recently, however, that we discovered that the myrtle berries – and leaves too – are actually edible. We are still experimenting with this, but in general the leaves may be added to soups and stews in a way similar to laurel leaves, imparting a subtle flavor and aroma (remove before eating), while the ripe berries can be likewise used in stews, sauces, meat, chicken, fish and even grain dishes. They have a fruity, slightly astringent flavor.

Myrtle berries are quite ripe when they are dark purple to black in color, which happens around here as late as November-December. Places where myrtle hedges are used for decorative purposes are good locations for picking; I can’t imagine anyone would object. Myrtle would be a good choice for planting on one’s property as well. It’s a hardy shrub which always looks fresh and smells delightful.

Besides flavoring various dishes, I have read that myrtle berries can be made into jam or steeped in alcohol to make a drink traditionally produced in Sardinia. We haven’t tried this yet but might experiment in the future. Myrtle also has some unique health properties, in particular for treatment of respiratory conditions and skin health. Here is a simple recipe for making myrtle oil at home. If I try this out, I will let you know.

Drying hyssop

hyssop

We don’t often find fresh hyssop in stores, so when we came across it we grabbed a bunch and I decided to take advantage of the dry, windy weather we’ve been having to dry it up.

Dry windy spells in winter are a pain. They make being outside unpleasant, they cause one’s hands to dry out and crack, and what’s more serious, they dramatically increase the risk of wildfires (by the way, thanks so much to those who have expressed concern for our family – we are thankful to say we are in no immediate danger of fire, but are keeping alert and hoping for rain). But these winds are perfect for drying herbs.

Drying hyssop – or any herbs, really – is very simple. All you have to do is take a good-sized bunch, tie it by the stems and hang it outside – or, if the wind is really violent like it was this time, put it in a mesh bag to prevent the leaves from scattering.

Of course, a food dehydrator or a simple oven can work just as well. Or you can hang the herbs inside. They will dry up eventually, only it will take longer. On the upside, they will make the room smell nice.

Once the hyssop is properly dry, remove and crush the leaves and discard the stems. The crushed leaves can be used as a seasoning in various dishes or, as is more common in Israel, mixed with olive oil, salt and sesame seeds to make za’atar, a popular local dip eaten with pita bread and/or cream cheese.

Sourdough Simplicity: book review

low-res-sourdough

For a while now I’ve been meaning to review a very useful little book by my friend Rose Godfrey, Sourdough Simplicity. It’s really a very handy, practical instruction manual for those just striking out in the world of sourdough starter. Personally I’ve been wanting to try sourdough for a while, and was only stopped by my husband’s “eek!” factor. Now I’m more inspired than ever to give it a shot.

I’ll be honest: despite Rose’s just warnings about whole-grain sourdough bread coming out dense, if I do make the effort at sourdough, it will only be with whole grain flour (either wheat, rye or spelt). I just don’t see much point in making a starter, keeping it going, investing in a long rise process, making the gamble of an unpredictable product, and all this to get what essentially is still white bread from refined, nutrient-stripped flour (though undoubtedly superior in taste to the usual quick-rise bread).

Yes, traditionally fermented bread is in many cases better tolerated by those with grain allergies, as opposed to quick-rise bread made with baker’s yeast. But still, from a nutritional standpoint, it isn’t much. It might not give you an allergic reaction, but it won’t give you much of anything else, either.

Either way, Sourdough Simplicity is a great way to get going in that confusing new world of sourdough starter. It also provides many great recipes, creative ways of utilizing leftovers, and troubleshooting tips.

“I needed a method that was pure simplicity and a recipe that tasted great. In the end, I found that sourdough baking did not have to be complicated, and it could fit all my objectives. I started with a wonky oven that had 4 distinct heat zones and still managed to bake delicious breads. My loaves are not always Pinterest-perfect, but they are tasty, nutritious, and easy to make. There is always some minor variation from loaf to loaf, and we are OK with that.”

Easy Coconut Cream

Every time I’m whipping up a dessert, my husband hopefully asks, “is it parve“? Parve essentially means a dish that contains neither meat nor dairy. Since Orthodox Jews must wait six hours after consuming meat or chicken before they can eat dairy, it’s no wonder most people try to make their desserts parve. Unless they are vegetarians, in which case it doesn’t matter.

Unfortunately, in many cases this leads people to use unhealthy ingredients such as margarine or fake cream with partially hydrogenated vegetable oils in the desserts they make – and a whole lot of sugar to make the entire thing more palatable. For me, parve dessert has usually meant fruit salad or, in season, chilled melon or watermelon… that is, until recently I discovered the wonders of coconut cream.

Coconut cream contains natural, stable, healthy fat (in particular containing large amounts of lauric acid, which is renowned for its antibacterial, antiviral properties) and, when chilled, has the perfect consistency for whipping – in fact, it acts almost exactly like normal cream.

coconutcream

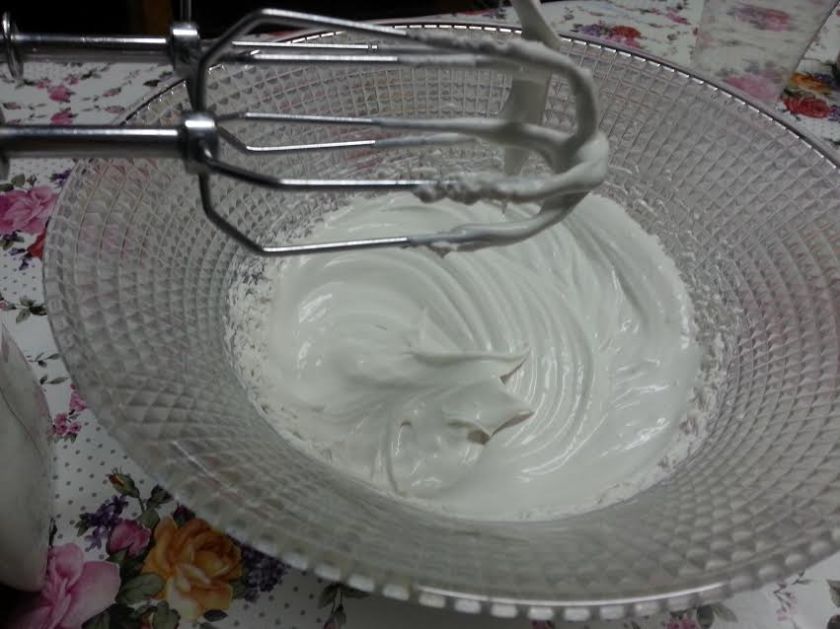
Whipped coconut cream. Doesn’t it look just like the real thing?

So here’s how you do it: pick  a can of coconut cream containing at least 17%-18% fat and chill overnight. A hard fatty layer will form on top; skim it off carefully with a spoon and add a little of the liquid at the bottom (use the rest of the liquid in baking or smoothies). The cream can be whipped and combined with all sorts of flavorings to create a variety of desserts. Yesterday I made delicious halva mousse by whipping up the coconut cream with raw tahini and some honey. I imagine it would go equally nice with chocolate… yum! I imagine it can also be frozen to make natural, dairy-free ice cream.

Personally, I love coconut, but the taste of it is very mild in the cream, so even those who aren’t coconut-crazy can enjoy this.

***

I also wanted to let everybody know that the work on Your Own Hands, the new simple living book, is going well and at this point I have most of the first draft complete. I also put some improvements and formatting changes into The Practical Homemaker’s Companion, which is now 122 pages long. I left the Payhip price at 4$, less than the print and Kindle version, as I really prefer people to download from Payhip because it only takes a small commission compared to Amazon and payments are instantly transferred to our Paypal.

Preserving and processing hot peppers

Above: dried hot peppers

As we are still harvesting an abundance of hot peppers, we must think of ways to use up all this bounty before it spoils – or else preserve it for future use.

The easiest way by far to preserve hot peppers is drying them. This can be done in an oven, in a food dehydrator or outside in sunny weather. I don’t have a food dehydrator, so sun-drying and oven-drying are the two options I use.

To dry a batch of hot peppers, first cut them lengthwise and remove the seeds. Careful – wear gloves while handling, because those little capsicums can be treacherous. Place the peppers on a cookie sheet lined with baking paper.

If drying outside, cover the cookie sheet with metal wire, cloth mesh or anything else that will keep birds and insects away but still let sunlight get to the peppers. Place in direct sunlight and turn peppers over every few hours. This process may take several days, depending on the amount of light, degree of heat and humidity.

For oven-drying, place the cookie sheet with the peppers in the oven and turn it on a very low heat. Remember, you don’t want them to be roasted – you just want all the moisture to evaporate. Keep the peppers in the oven, turning from time to time, until they are quite dry and brittle.

At this point, your dry pepper slices can be stored in a tightly sealed jar, where they will keep for a long time. You can also pulverize them in a food processor and make your own hot pepper powder, which you can likewise store in a jar. This powder can be used for seasoning various dishes as is, or made into hot paste or sauce with some salt, fresh or dry herbs and olive oil.

***

As this will probably be my last post before Rosh Ha-Shana, I’d like to take the opportunity to wish all my Jewish readers a very happy start of this new year.

The perils of peppers

This season we were blessed with a large quantity of hot peppers (all from only four thriving plants), so I’ve been busy making hot sauce inspired by the Yemenite hot pepper spread/dip called Zhug. I don’t really have a recipe; just throw a bunch of de-seeded hot peppers, a head of peeled garlic cloves, a bell pepper, some tomatoes, a generous splash of olive oil and salt to taste into a food processor and whip it all up. It makes a fabulous sauce\paste to add to stews, meat and fish dishes, soups, etc.

Unfortunately, it has been a while since I used fresh hot peppers, so I was careless and didn’t use protective gloves. The deception was in the delay: I didn’t feel any burning in my fingers until I was done cutting up the peppers. Then it hit with a vengeance.

Even more unfortunately, my kids, who like to get into anything that goes on in the kitchen, grabbed some peppers too – and touched their faces without even washing their hands. Ouch. It was a disaster – for the next hour, I was dealing with crying, hurting kids. My eldest sincerely advised me to throw the whole bunch of peppers away (“because nobody wants to eat something like this!”).

I’ve tried some of these remedies for stopping hot pepper burn, but nothing really helped us. The kids felt better pretty quickly. I had to endure several very unpleasant hours of burning sensation in my fingers, hands and any part that was exposed to the capsaicin in the hot peppers.

20160913_165128

Hot peppers: beautiful but deadly (well, almost)

Lesson learned: next time I work with hot peppers, I’m going to wear gloves and warn my children to stay away.

By the way, I wanted to let you know that The Practical Homemaker’s Companion is now available in a new, extended edition of 90 pages, with added content and photos – for the same price. Those of you who have already bought a copy and are sorry to miss the new edition, don’t worry – simply email me using the contact form, and I’ll send you the updated version. Also available in print. Disclaimer: as the printed version is in black and white, I can’t vouch for its photograph quality. Opting for color print would have made the book too  expensive, so I compromised in favor of price.